

The most important factor which holds table tennis players back from gluing rubber on to their blade is how difficult it sounds and looks. To be frank, it looks difficult at the outset but we are here to help. Here’s an exhaustive guide on how to glue your table tennis rubber to the racket blade along with a simple video explaining the same.
In our previous piece we had explained the advantages and disadvantages of using a pre-made racket as compared to using a customized table tennis tennis racket.
Typically, players who are just starting out or haven’t reached an intermediary level are advised to use pre-made, ready to use table tennis rackets.
Also Read:
It’s only when one gets to a level of note, should you attempt to invest your time, effort and money – or at least two of those three – into your table tennis racket.
Please note, this piece is only about gluing the rubber on to a table tennis racket blade. If you are looking to understand how to remove a previous rubber piece from your racket, you can check that in another article found on this website.
First things first though.
Table of Content
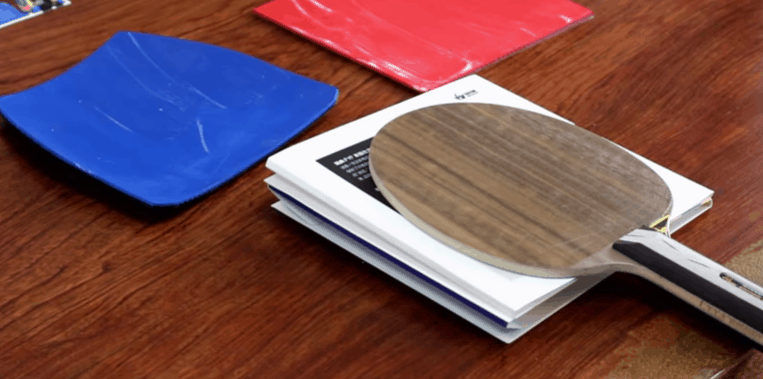
Let’s look at what are the components needed to glue rubber to a table tennis racket.
Other than the rubber and the blade, obviously, some of the required components to glue the rubber on to a table tennis racket are as follows:
- Glue
- Piece of Clean Cloth
- Sponge
- Pair of Scissors
- Roller (or a circular object)
- Blade
- Rubber
How to Assemble Your Customized Table Tennis Racket?
Now that all the components needed have been collected, you can start off by quickly watching this video below. We will explain the step by step process about gluing the rubber on to your blade in the section below.
As mentioned earlier, this is under the assumption we are assembling a fresh set of racket blade and rubber. For understanding how to remove old rubber from the blade, click here.
- Place the rubber with its top sheet facing downward on a table covered with a newspaper to avoid spillage on to the table or on a granite surface which is very easy to clean later
- Open the glue bottle and pour some glue on to the rubber
- Use a sponge or a brush to spread the glue thoroughly to the rubber. Make sure the entire piece of rubber is covered with one or two coats of glue depending on your preference. Rubber manufacturers typically advise one layer but some players use an extra second layer of glue for a better feel. Personally, I have never noticed a difference between the two.
- Ensure the glue has been applied thoroughly throughout the rubber to ensure the entire piece of rubber is stuck to the blade
- Keep the rubber on the side to dry out so that it gets a tacky feel
- Next up, repeat the process with the blade as well. One or two layers of glue is all that is needed but ensure it’s spread evenly and again, don’t miss applying glue on to any area. This could specially be a problem with the blade where it might be difficult to spot if a region has been missed out
- Once both, the blade and the rubber are glued, place the rubber on to the blade, press it tightly and then use a roller to ensure the two stuck together tightly. You don’t need to wait for both, glue on the blade and the rubber to dry before pressing them together although some prefer it that way
- In order to ensure the rubber remains tightly bound on to the blade, keep the racket under a heavy stack of books or a bed mattress or use a table tennis bat clamp. Keep this for an hour or so and allow the glue to dry
- Once the glue has dried, cut the excessive rubber from the blade carefully. If some portions of the rubber gets lifted during the cutting, repeat step 8. Remember, one side of a table tennis racket should be red and the other should have a black rubber according to the ITTF rules.
- Gluing the rubber on to one side of the racket is now done. Repeat steps 1 to 9 for the other side as well
Table Tennis Blade-Rubber Assembling FAQ
Which Glue Should be Used for a Self-Made Table Tennis Racket?
It is very important to note only the ITTF-approved glues can be used to make a table tennis racket. The glue shouldn’t have any volatile substances in it, i.e. should be a non-VOC glue and is a water-based glue. Three of the best glues we can recommend for a self-made, customized table tennis racket are Butterfly Free Chak, Killerspin Table Tennis Torque AQ and Tibhar Clean Fix. More on this can be found in a separate article here.
Can a Speed Glue be Used to Assemble a Table Tennis?
No, Speed Glues have been banned by the ITTF since September 2008. Read more about why speed glue cannot be used in table tennis any more here. Remember, rackets are regularly tested in competition to detect speed glues or their banned variants and if caught players are disqualified from the tournament.
Also Read:
How Many Layers of Glue Need to be Applied to the Blade and Rubber?
There is no hard and fast rule here and one layer apiece should be more than enough. However, if you think, you need a little more of a trampoline effect with an added layer, you can try that out too and check for any differences. One warning though, more the number of glue layers applied, heavier the racket becomes and that reduces control during matches.
How to Store the Glue?
It is very important not to store the glue you are going to use for your table tennis blade in the fridge or in a very cold temperature. That can cause the glue to freeze and once it gets to that stage, you wouldn’t be able to use it again.
What are Quick Glue Sheets to Make Customized Rackets?
This is another method which can be used to use self-made table tennis rackets but one which hasn’t found a lot of favour among table tennis players.
While it’s as easy to use Glue Sheets to stick the rubber to the blade, the one big issue with using them is it’s a lot more difficult to remove them as compared to glue while trying to change rubbers.
The residue left behind while removing Glue Sheets makes it difficult to recommend if you are making your own table tennis racket.
Can We Start Playing with a Custom-Made Racket Immediately after Sticking the Rubber?
Typically, a water-based glue remains wet for a while after the rubber is stuck to the wood, so it might make more sense to let the glue dry overnight and use the racket the next day. This drying of glue also helps the settling of the minute bubbles which might have formed underneath the rubber.
Should a Player Attempt to Make the Custom-Made Racket on His/Her Own?
Typically, it’s not too difficult to repeat the aforementioned process but the learning could take some time. So, if you want to avoid spending too much time and effort on it, it’s best you get your initial custom-made table tennis rackets from a sports store or from someone who knows how to glue the rubber.
However, you should also look to try fixing your racket on your own at times to get used to it; once you get a hang of how to customize your racket, it gets very easy. Like most other things in life!